 ChatGPT
 Claude
 Gemini
 Perplexity
Frequently Asked Questions (FAQ)
Can I provide my assessment in another language?
Absolutely! One of the great features of the Vessel Smart Assessment Platform is that assessments can be accessed and completed in virtually any language. Your respondents can view and complete assessments in their preferred language, making it easy to reach a global audience without creating separate assessment copies.
How to View an Assessment in Another Language
The easiest way to provide an assessment in another language is to use your browser's built-in translation feature. Here's how to do it with Google Chrome (this feature is also available in most other modern browsers like Edge, Firefox, and Safari):
Step 1: Open the Assessment in Chrome
- Navigate to your assessment in the platform using Google Chrome
- Share the assessment link with your respondent or open it yourself to preview
Step 2: Access Chrome's Translation Menu
Chrome automatically detects when a page is in a different language and offers to translate it. You can also manually trigger translation:
- Look for the Translate icon — In the Chrome toolbar (top-right), you may see a Translate icon (looks like a speech bubble)
- If not visible, access it through the Menu:
- Click the three vertical dots (⋮) menu button in the top-right corner
- Look for Translate in the menu
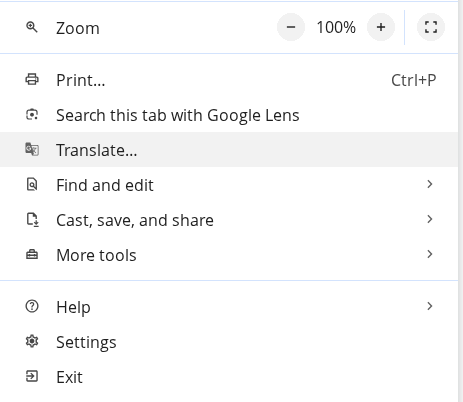
Step 3: Select Your Language
Once you click Translate, a menu will appear showing the current language and letting you choose the target language:
- The current language is shown (usually "English" or detected automatically)
- Click the dropdown to select the language you want
- Choose from dozens of available languages (Spanish, French, German, Mandarin, Japanese, etc.)
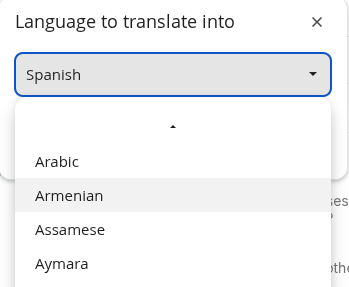
Step 4: View the Assessment
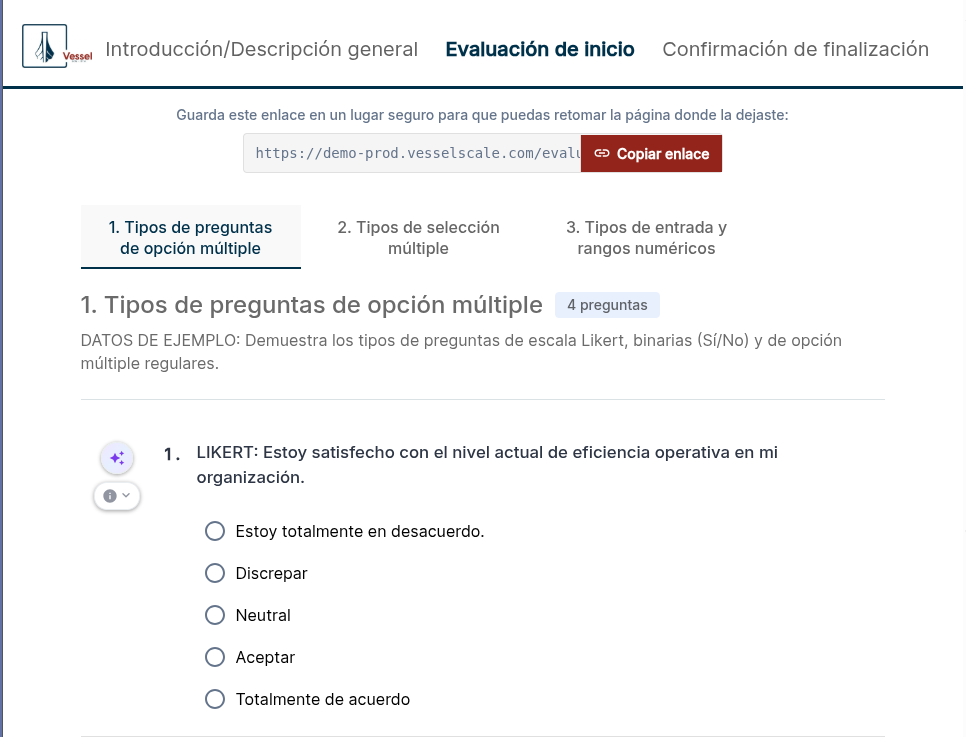
The entire assessment will instantly translate to your selected language. The respondent can now: - Read all questions in their preferred language - Complete the assessment with instructions in their language - Submit responses as normal
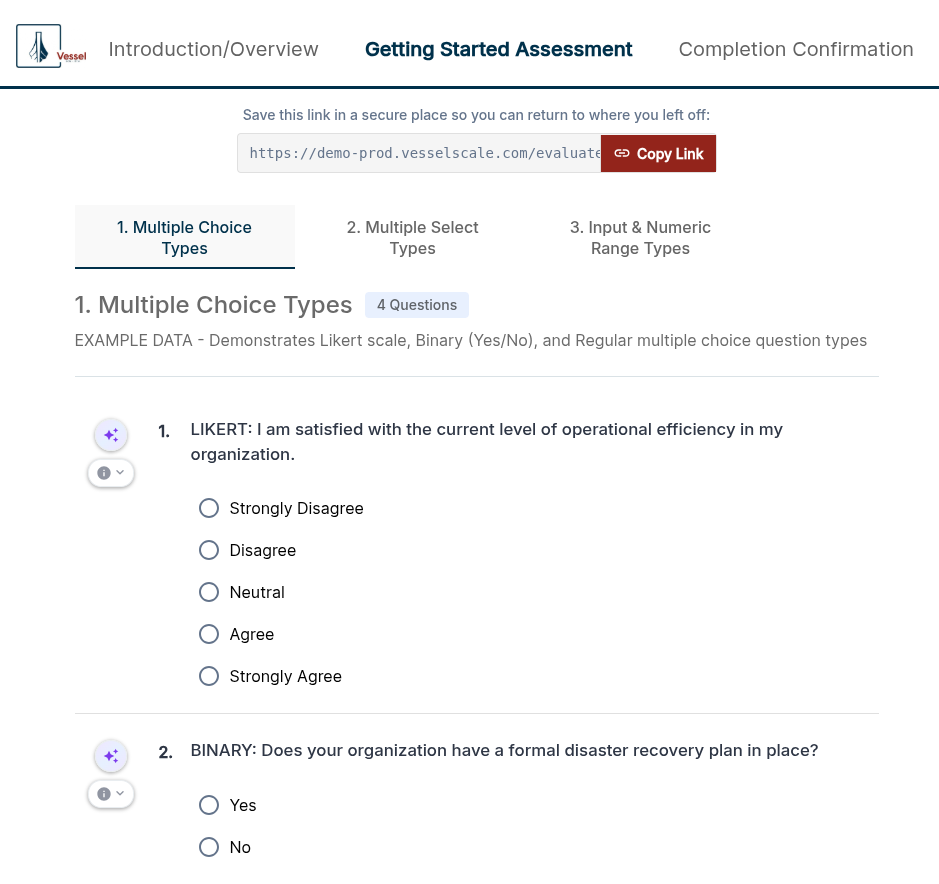
Original Assessment (English):
Same Assessment Translated (Spanish example):
Using Other Browsers
The translation feature is built into most modern browsers:
- Google Chrome: Menu (⋮) → Translate
- Microsoft Edge: Menu (⋮) → Translate
- Firefox: Right-click → Translate Page (or Menu → Translate Page)
- Safari (Mac): Menu → Translate (on newer versions)
Benefits
This built-in translation feature allows you to:
- ✅ Provide assessments to respondents in their preferred language
- ✅ Eliminate language barriers — no need to manually translate or create duplicate assessments
- ✅ Maintain assessment consistency — all respondents see the same questions and scoring
- ✅ Expand your reach to Spanish-speaking teams, suppliers, and partners
I'm seeing a "404 error" or an error that won't go away even though the feature should be working. What should I do?
This can happen when your browser has cached an outdated response. The solution is to perform a "hard refresh" to clear your browser's cache for that page.
Recommended: Chrome Browser — Shift+Click the Refresh Button
The easiest method in Google Chrome:
- Hold Shift
- Click the Refresh button (circular arrow icon) in your toolbar
- Wait for the page to reload
This is the most reliable and user-friendly approach for most users.
Alternative Hard Refresh Methods (All Browsers)
If the Shift+Click method doesn't work, or you use a different browser, try one of these keyboard shortcuts:
Windows & Linux
- Ctrl + Shift + R (recommended)
- Ctrl + F5 (alternative)
Mac
- Cmd + Shift + R (recommended)
- Cmd + Option + R (alternative)
Still Having Issues?
If a hard refresh doesn't resolve the error:
- Clear your entire browser cache:
- Open your browser's DevTools (F12 or right-click → Inspect)
- Go to the Application (or Storage) tab
- Click Clear Storage or Clear Site Data
-
Reload the page
-
Try an incognito/private window:
- Open a new private/incognito window
- Navigate to the same page
-
If it works here, the issue was definitely your browser cache
-
Contact support:
- If the error persists across browsers and devices, please reach out to the support team with details about what you were trying to do
What is a YAML file and why might I use it?
YAML (Yet Another Markup Language) is a plain-text format used for storing structured information in an easy-to-read way. It's commonly used for configuration files because it looks a lot like simple lists and indented outlines — no programming is required to read or edit it. This makes YAML ideal for both humans and AI systems to work with.
Why Use YAML for Importing & Exporting?
YAML is particularly useful for more complex or structured data that doesn't fit neatly into a simple CSV table format. While CSV works great for flat, tabular data with a fixed number of columns, YAML can represent nested structures, lists, and complex relationships — exactly what you need for detailed account and assessment configurations.
Key benefits of YAML:
- ✅ Human-readable — Easy to read and edit in any plain text editor (Notepad, VS Code, etc.)
- ✅ AI-friendly — AI agents can readily help you convert YAML files to other formats or edit them
- ✅ Supports complex structures — Handles nested data, lists, and relationships that CSV cannot represent
- ✅ Version-control friendly — Plain text format works well with Git and version control systems
- ✅ Flexible — Edit in a text editor or import/export through the platform UI
Learning More About YAML
If you'd like to learn more, these resources are helpful:
- Official YAML site — Complete specification and reference
- Quick written intro — Learn X in Y Minutes — Short, easy-to-scan introduction
- Beginner-friendly guide — TutorialsPoint — More examples and explanations
- YAML tutorials on YouTube — Video-based learning
Using AI to Work with YAML
One of YAML's biggest advantages is that AI assistants can easily help you with it. You can: - Ask an AI agent to convert a YAML file to CSV format (or vice versa) - Have AI help you edit or structure your YAML data - Use AI to validate your YAML syntax and fix errors
Simply copy your YAML content into an AI chat or ask for help converting between formats — AI systems handle YAML very naturally.
Editing YAML in Built-in Text Editors
If your YAML file doesn't open automatically in the platform or you want to edit it before importing, you can use your operating system's built-in text editor.
Windows — Notepad
- Open the file:
- Right-click the
.yamlor.ymlfile - Select Open with → Notepad (or just Notepad)
-
If Notepad doesn't appear, click More apps and look for it
-
Edit and copy:
- Make your changes in Notepad
- Select all text: Ctrl + A
-
Copy to clipboard: Ctrl + C
-
Paste into other apps:
- MS Word: Open Word, place cursor where you want text, press Ctrl + V
- Google Sheets: Click a cell, paste with Ctrl + V (each line becomes a new row)
-
Google Docs: Click where you want text, paste with Ctrl + V
-
Save changes (if needed):
- Press Ctrl + S to save
- When saving as YAML, ensure the filename ends in
.yamlor.yml
Mac/OSX — TextEdit
- Open the file:
- Right-click the
.yamlor.ymlfile - Select Open With → TextEdit
-
If it opens in a formatted view, go to Format menu and select Make Plain Text
-
Edit and copy:
- Make your changes in TextEdit
- Select all text: Cmd + A
-
Copy to clipboard: Cmd + C
-
Paste into other apps:
- MS Word: Open Word, place cursor where you want text, press Cmd + V
- Google Sheets: Click a cell, paste with Cmd + V (each line becomes a new row)
-
Google Docs: Click where you want text, paste with Cmd + V
-
Save changes (if needed):
- Press Cmd + S to save
- When saving, choose Plain Text format (not Rich Text)
- Ensure the filename ends in
.yamlor.yml
Pro Tip: Copy/Paste Workflow
If you're moving YAML between applications: 1. Open file in text editor (Notepad or TextEdit) 2. Select all and copy 3. Paste into the destination app (Word, Sheets, Docs, or the platform) 4. For importing back into the platform, copy from the destination and paste into the import dialog
When I click a Sidebar tab, why does it take me to a different page than before?
This is by design! The system remembers where you were last working in each section. When you click on a Sidebar tab (like Accounts, Assessments, Dashboard, etc.), it takes you back to the specific page and filters you were viewing the last time you were in that section. This helps you quickly resume your work without having to navigate back to where you were.
Here's how to navigate effectively:
- To go to the root/parent location of a section (e.g., the main Accounts list, Assessments list, etc.):
- Option 1: Click the Sidebar tab twice (once to activate, then again to go to the root)
-
Option 2: Use the Breadcrumbs at the top of the page to navigate to the parent location
-
About the "Back" button: The browser-style "Back" button (← arrow) goes to your previous page in your browsing history, not to the parent section. This is standard browser behavior. Use Breadcrumbs if you want to go to the parent location instead.
Note: The system uses browser session storage to remember your navigation state, so this preference resets when you close your browser window.
How do I create a new Account?
For detailed instructions on creating an Account, please see the Create Account guide in the Accounts section.
How do I create a new Assessment?
See the Create Assessment guide for step-by-step instructions on creating an assessment for your respondents.
How do I send an Assessment to respondents?
Visit the Send to Respondents guide in Getting Started to learn how to distribute assessments.
How do I view and analyze Assessment results?
The Analyze Results guide walks you through viewing respondent scores and data.
How do I create a Web Report?
For instructions on creating an interactive web report from assessment data, see Create a Web Report.
How do I download assessment data as CSV?
See the Download CSV guide for instructions on exporting your assessment data.
How do I use the Pivot Table for data analysis?
The Pivot Table guide explains how to create custom pivot tables to analyze your assessment data.
How do I edit my Account details?
Visit the Edit Account page to learn how to update your account information.
How do I design a custom Assessment Definition?
The Design an Assessment guide in Getting Started covers creating your custom assessment structure.
How do I set up Email Templates?
See the Email Templates guide under Settings to customize your outgoing emails.
How do I customize Branding?
Visit Branding Settings to learn how to customize your organization's logo, colors, and branding.
How do I manage User Permissions?
The Permissions guide under Settings explains how to control user roles and access levels.
How do I create an Assessment Definition in the Library?
See Create Assessment in the Library section for instructions on building reusable assessment templates.