 Claude
 Perplexity
Account Details
The Account Details page shows all information associated with a specific account. It is organized into five tabs: Overview, Assessments, Reports, Contacts, and Assignments.
What you can do here
- View contact information, industry classification, and location
- See all assessments linked to this account
- Review all assessment reports generated for this account
- Manage team contacts and their portal access
- Assign team members to roles for this account
- Configure which Web Reports appear in the Client Portal
- Edit the account or preview the Client Portal as the client sees it
View as Client
The View as Client button opens a live preview of the Client Portal for this account — exactly as the client would see it.

When you click View as Client, a Preview Mode banner appears at the top of the portal confirming that you are viewing on behalf of this account. You can return to the Account Details page at any time by clicking Return to Account.
Use this to:
- Verify the client can see the correct assessments
- Confirm which Web Reports are available in the portal
- Troubleshoot portal access issues before escalating to the client
Overview tab
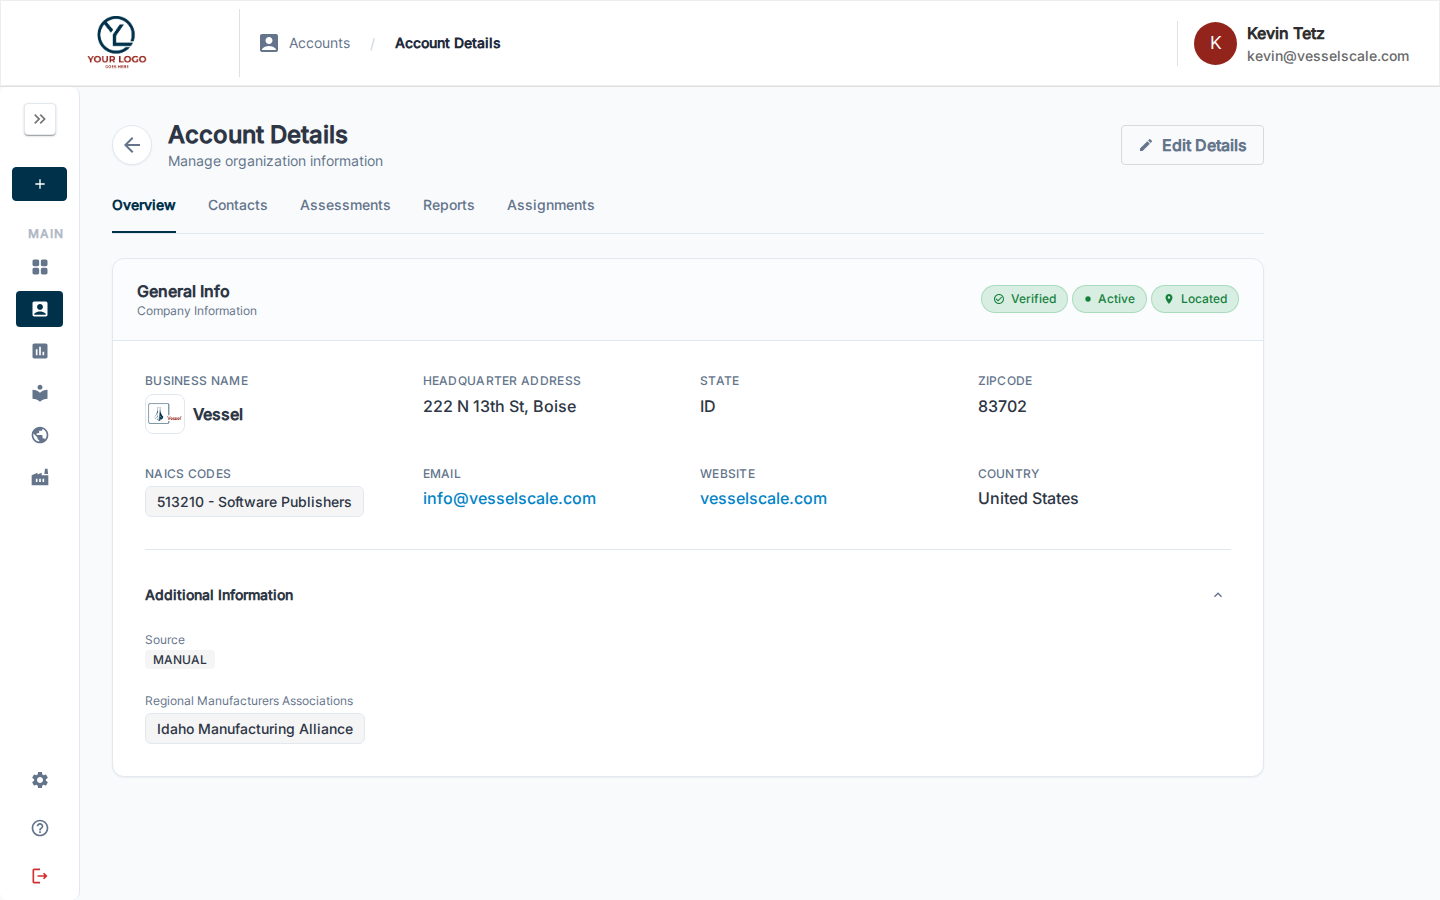
The Overview tab provides a comprehensive snapshot of the organization: company name, contact information, geographic location, NAICS industry codes, and operational details. This is your starting point for understanding the complete profile of an account and its current status in the system.

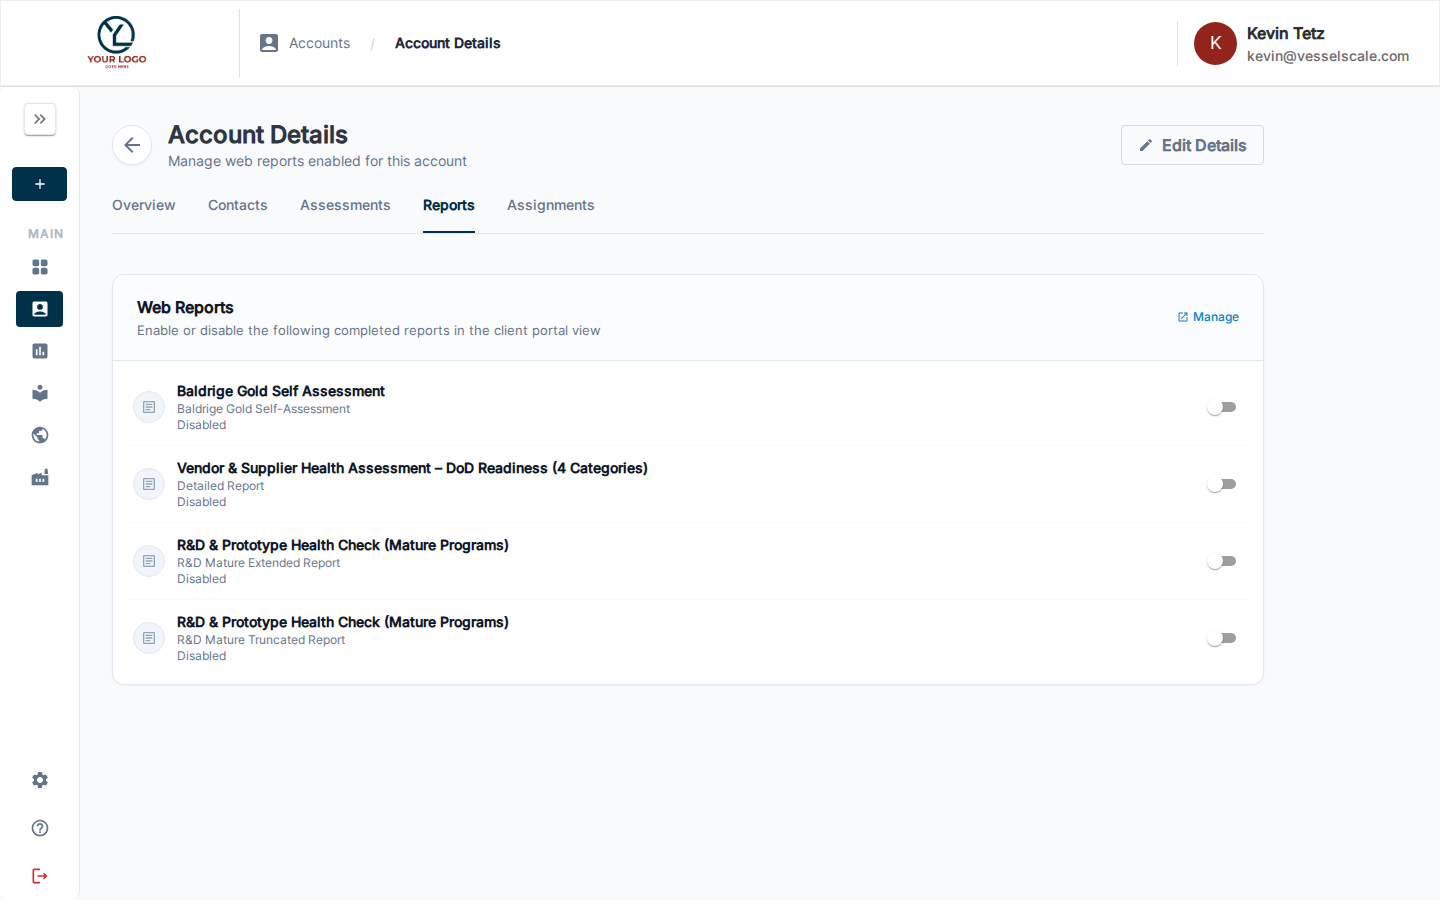
Web Reports Configuration
The Web Reports panel within the Overview tab controls which assessment report templates are made available to this account's client portal view.
When you enable Web Report templates for an account, they become available for the organization's representatives to view in the Client Portal. This allows you to:
- Control Portal Visibility — Choose which report templates clients can access
- Customize Per Account — Different accounts can have different report templates available
- Manage Sensitivity — Enable only reports appropriate for a specific client
- Streamline Navigation — Clients only see the reports that are relevant to them
How Web Reports configuration works
- Reports are created in Settings — Administrators create and manage Web Report templates in Settings → Web Reports
- Templates are enabled per account — On this page, select which available templates should be enabled for this specific account
- Clients see enabled reports — When clients log into the Client Portal, they see a Reports card showing only the enabled reports for their account
- Only active templates shown — Only Web Report templates marked as Active in Settings are available for account assignment
When you check the box next to a report template, that report becomes visible to the account in the Client Portal. Unchecking removes it from the portal view. Changes take effect immediately — no additional save step required.
For more information about creating and managing Web Report templates, see Web Reports in Settings.
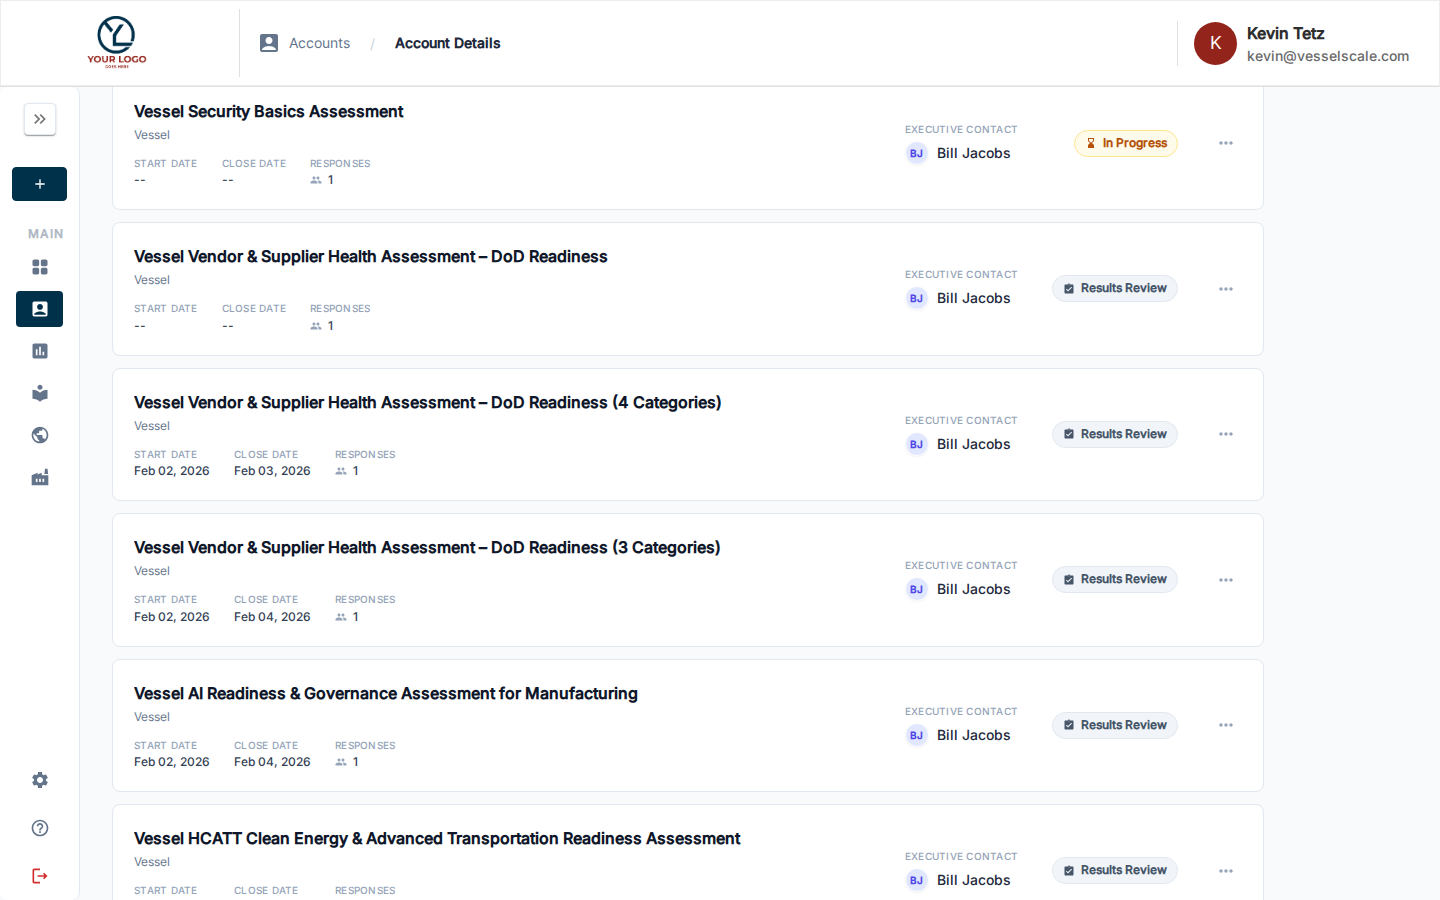
Assessments tab
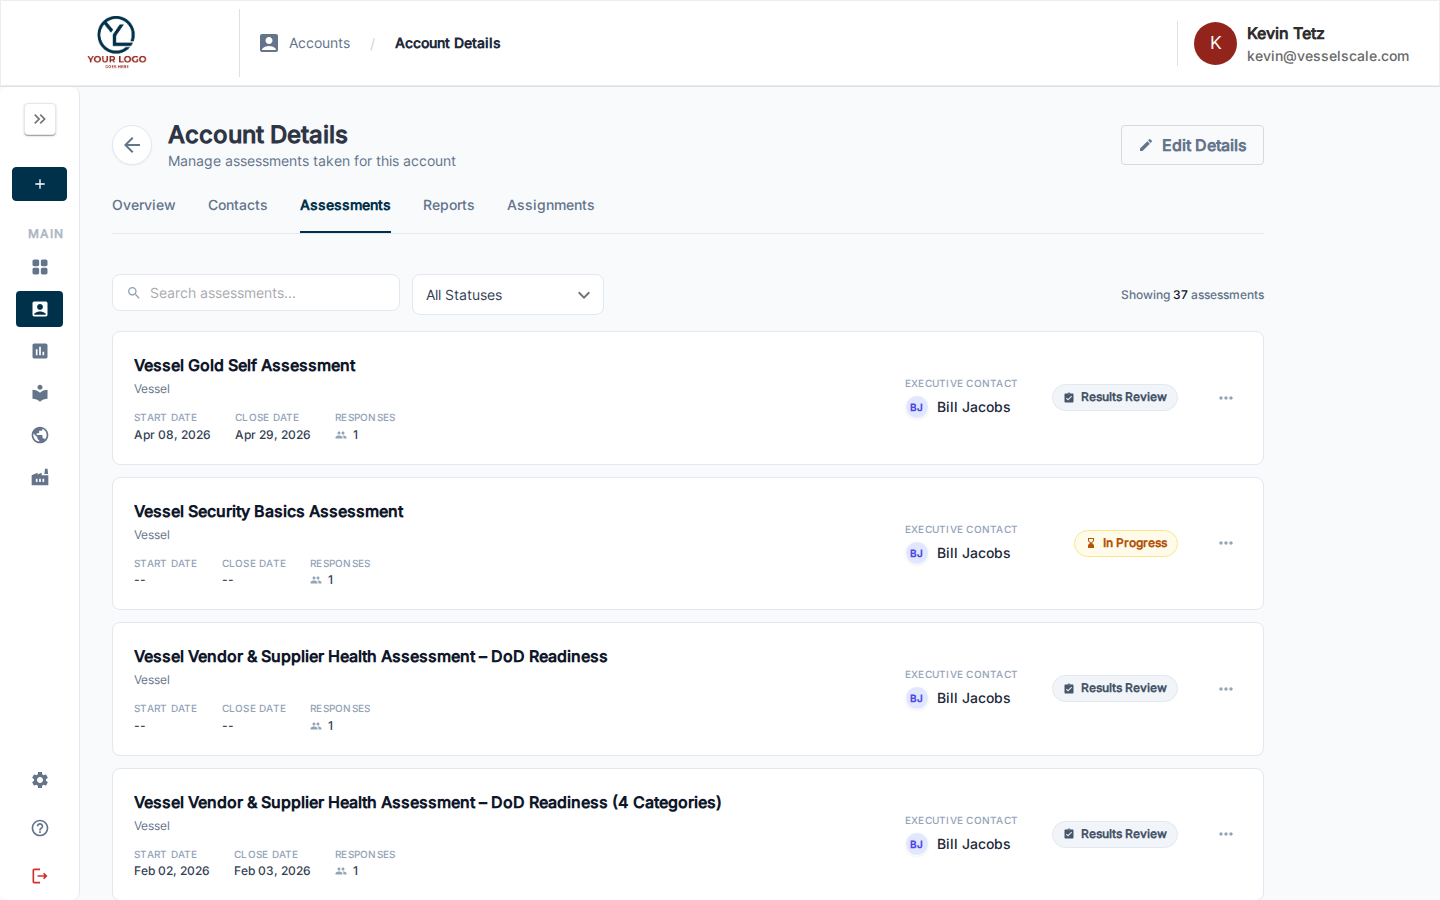
The Assessments tab displays all assessments associated with this account. For each assessment you can see:
- Assessment name and collection
- Start and close dates
- Number of responses
- Executive contact assigned to the assessment
- Current status (e.g. In Progress, Results Review, Completed)
This gives you a complete audit trail of the account's assessment activity and makes it easy to track progress across multiple assessments over time. Use the search bar and status filter to narrow down the list.
Reports Tab
The Reports tab provides a centralized view of all assessment reports generated for this account.

This tab shows:
- All assessment reports linked to assessments for this account
- Report types — Web reports, PDF reports, or analysis documents
- Generation dates — When each report was created
- Quick actions — View, download, or manage reports
From this tab, you can:
- Review assessment reports — View completed reports from any assessment for this account
- Manage PDF access — Control which PDF report templates are available (configured in Overview tab)
- Manage Web access — Control which Web Report templates are available (configured in Overview tab)
- Share reports — Generate and share specific reports with clients or stakeholders
For more details on creating and managing reports, see:
- Report Builder — How to analyze results and write assessment reports
- PDF Reports — Configure and manage PDF report templates
- Web Reports — Create and manage web-based report templates
Contacts Tab
The Contacts tab allows you to manage team members and contacts associated with this account.
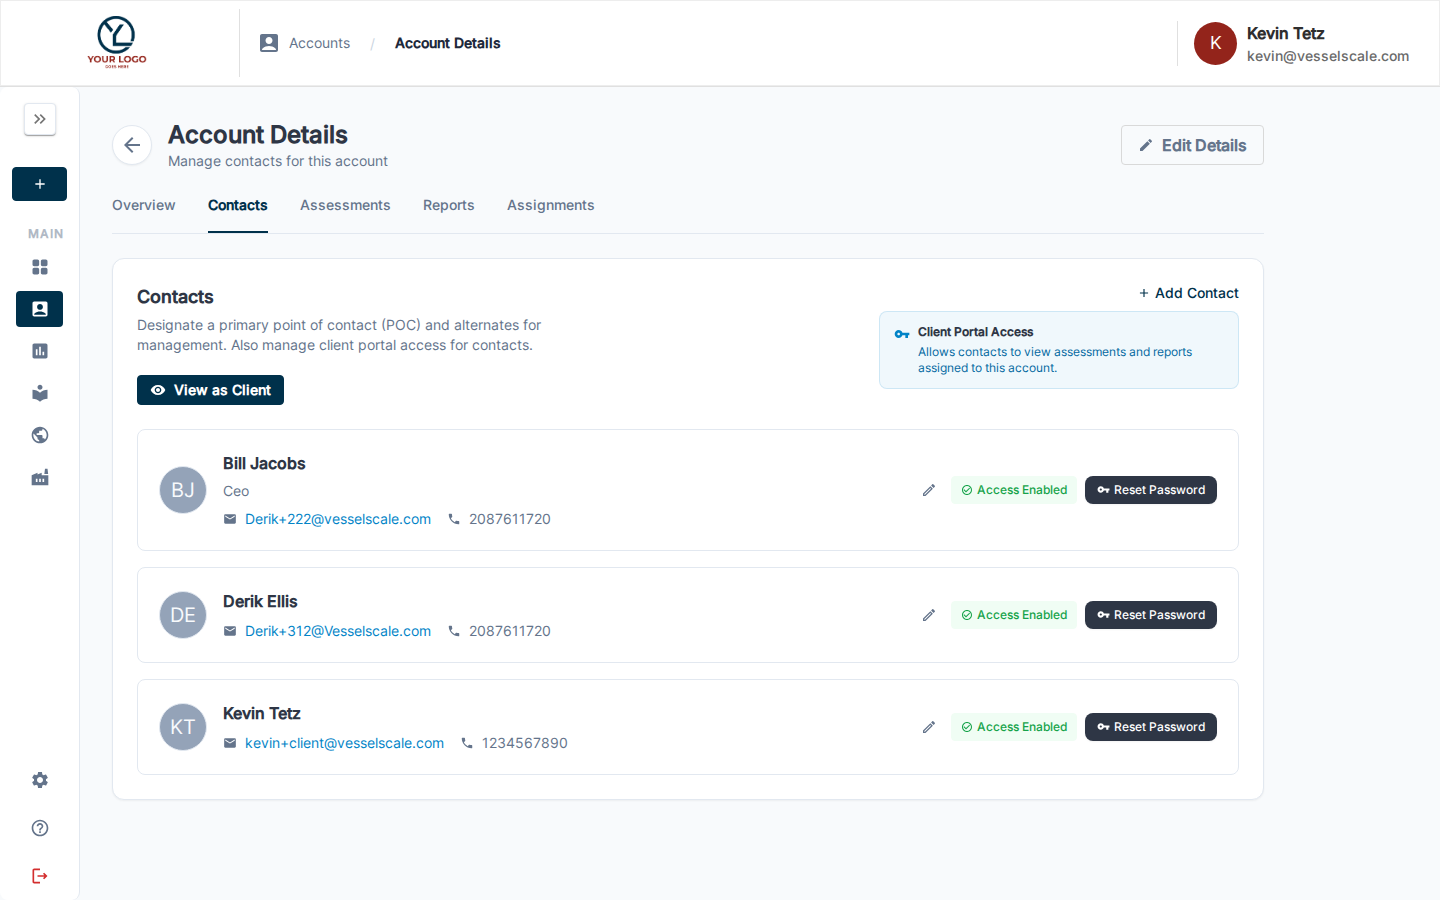
This tab shows all contacts linked to the account, including:
- Contact name and role
- Email address and phone number
- Portal access status (whether they can access the Client Portal)
- Account assignment status
You can:
- Add new contacts — Invite team members to the account
- Update contact info — Edit phone, email, and other details
- Manage portal access — Control who can access the Client Portal
- Remove contacts — Unassign contacts from the account

Assignments Tab
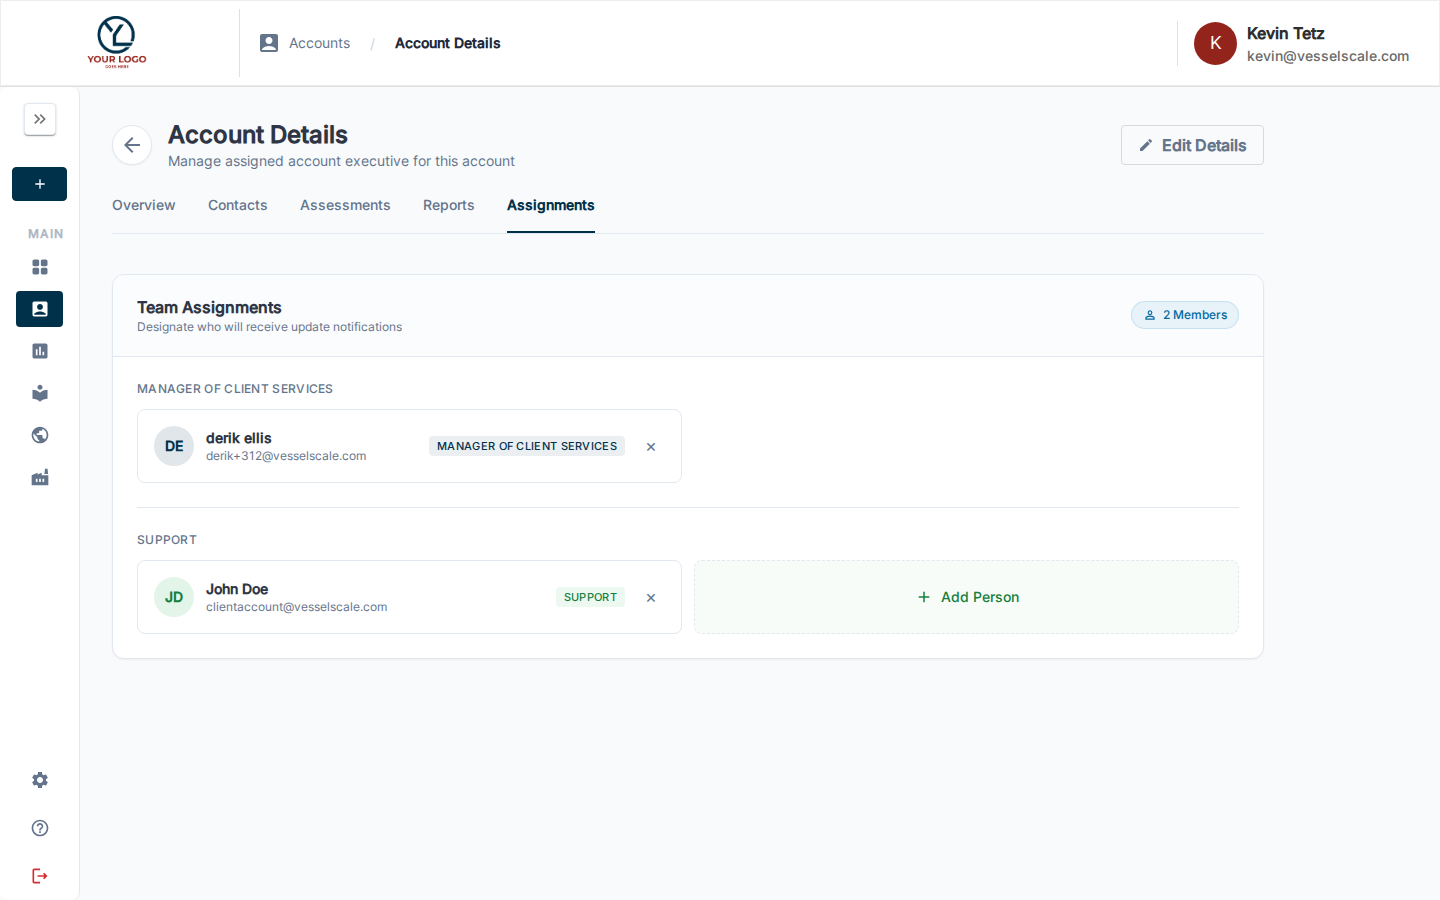
The Assignments tab controls team assignments for this account — designating who will receive update notifications and manage the client relationship.
Team Assignments
The Team Assignments panel shows all configured role slots for this account. Each role slot can have one or more users assigned.
Manager of Client Services
Role name is configurable
The label Manager of Client Services (and other role titles shown here) can be customized for your organization on the Branding settings page. The exact titles displayed will match whatever your organization has configured.
The Manager of Client Services role designates the primary person responsible for the client relationship on this account. This person will:
- Receive update and activity notifications for the account
- Be visible to the client as their main point of contact
- Appear on assessments associated with this account as the executive contact
To assign a Manager of Client Services:
- Open the Assignments tab on the Account Details page
- Under Team Assignments, locate the Manager of Client Services (or your organization's equivalent role name) section
- Click + Add Person to open the user selector
- Search for and select the user to assign
- The assignment saves immediately
To remove a user, click the × on their assignment card.
Other role slots
Additional role slots (such as Support) may appear depending on how your organization has configured team roles in Branding settings. Each works the same way — click + Add Person to assign a user.

Geocoding
The Geocoding section allows you to assign geographic coordinates to an account based on its address. This enables the platform to map accounts in the Ecosystem view and support location-based filtering.
Address accuracy is critical
For geocoding to work correctly, the account's address must be complete and correctly formatted. Verify the street address, city, state/province, and postal code in Edit Account before geocoding.
Related
- Edit Account — Update account information
- Accounts — Accounts overview
- Client Portal — Preview what clients see in their portal
- Web Reports — Create and manage report templates
- Assessments — Assessment overview
- Branding — Customize role names and team labels