 Claude
 Perplexity
Intake Forms
Intake forms are publicly accessible forms that collect company and contact information from prospective clients. When a visitor submits an intake form, their data is saved to the platform as an Account and Contact — and optionally, an Assessment is automatically created for them.
Overview
Each intake form is a configuration that controls:
- Which pages appear in the form (company lookup, contact info, county, industry, etc.)
- Whether an assessment is automatically created upon submission
- Which contact fields are required
- Custom branding for the landing and methodology intro pages
- Whether an email notification is sent upon submission
- A legal agreement page the user must accept
The same form can be shared as a URL link and accessed by anyone without logging in. Multiple configurations can exist, but only one is the default (used when no specific formId is provided in the URL).
Managing Intake Forms
Navigate to Settings → Intake Forms to view all configurations.
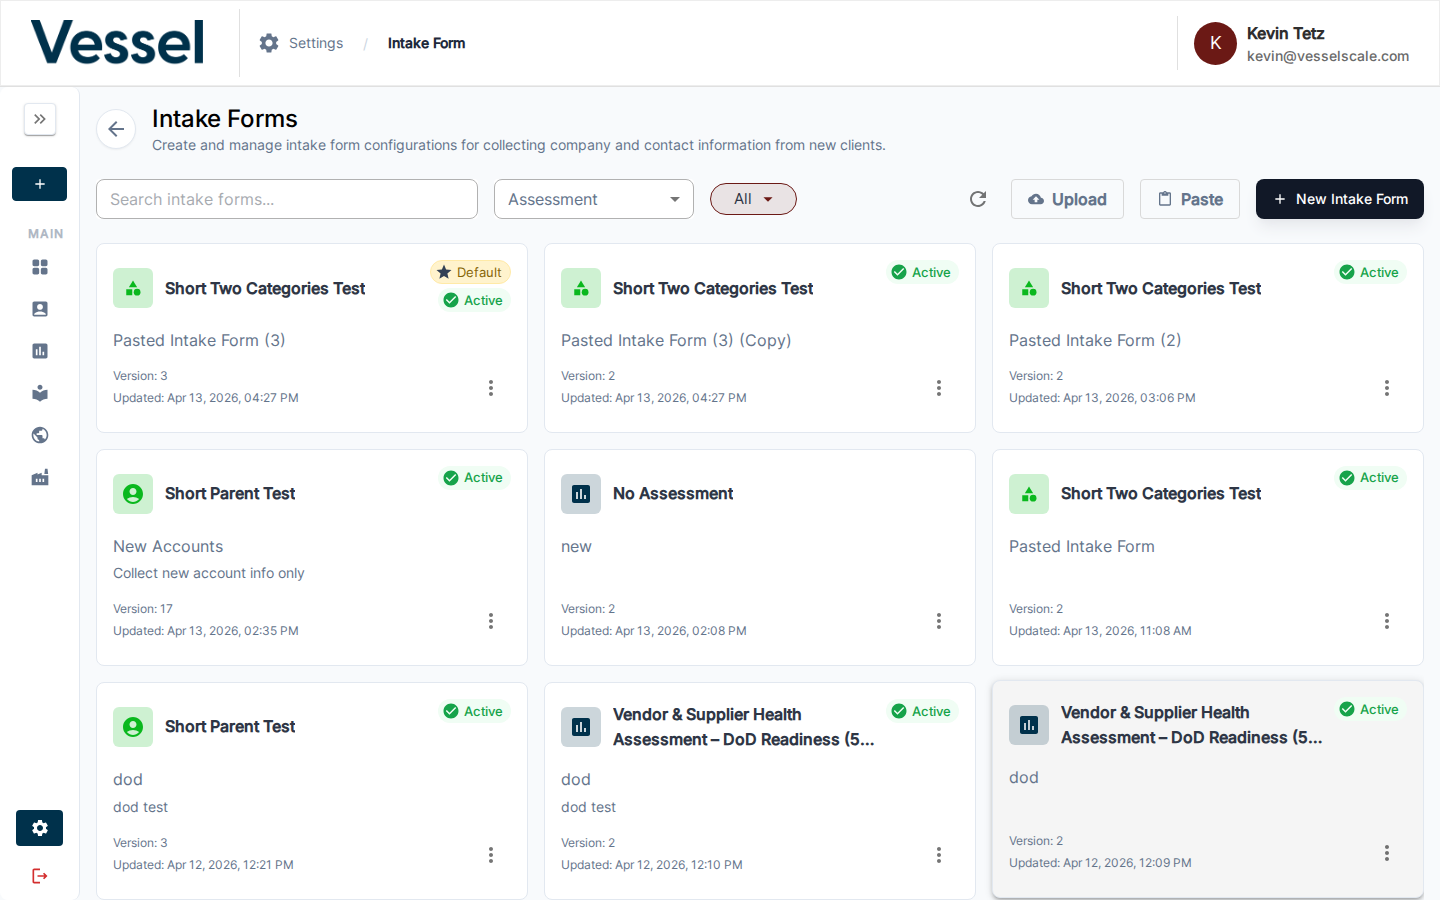
The List View
Each intake form appears as a card showing:
- Assessment icon and name — the assessment definition linked to this form, or "No Assessment" if the form is data-collection only
- Form name — the internal name you gave the configuration
- Description — optional short description
- Active badge — shown when this form is the default
- Version — increments automatically on every save
- Updated date — when the configuration was last changed
Cards are sorted by most recently updated. Click any card to open the editor.
Filtering
| Control | Purpose |
|---|---|
| Search box | Filter by form name or description |
| Assessment dropdown | Show only forms linked to a specific assessment definition |
| All / Default / Not Default chip | Filter by whether the form is the active default |
Actions Menu

Click the three-dot (⋮) menu on any card to access:
| Action | Description |
|---|---|
| Copy URL | Copies the public intake form URL to clipboard: {origin}/intake-form?formId={uuid} |
| Copy Config | Copies the raw JSON configuration to clipboard |
| Copy to New Intake Form | Duplicates the form as a new inactive configuration named {name} (Copy) |
| Download Config | Downloads the config as a .json file |
| Edit | Opens the configuration editor |
| Delete | Permanently deletes the configuration (with confirmation) |
Import Options
Two buttons allow you to create a new form from an existing configuration:
- Upload — Select a
.jsonfile from disk; creates a new configuration named"Pasted Intake Form"(or"Pasted Intake Form (2)"etc. to avoid collisions) - Paste — Opens a dialog where you can paste JSON directly or read from the clipboard
These are useful for copying configurations between environments or sharing form designs with other organizations.
Creating a New Form
Click New Intake Form (top right) to open the editor in create mode.
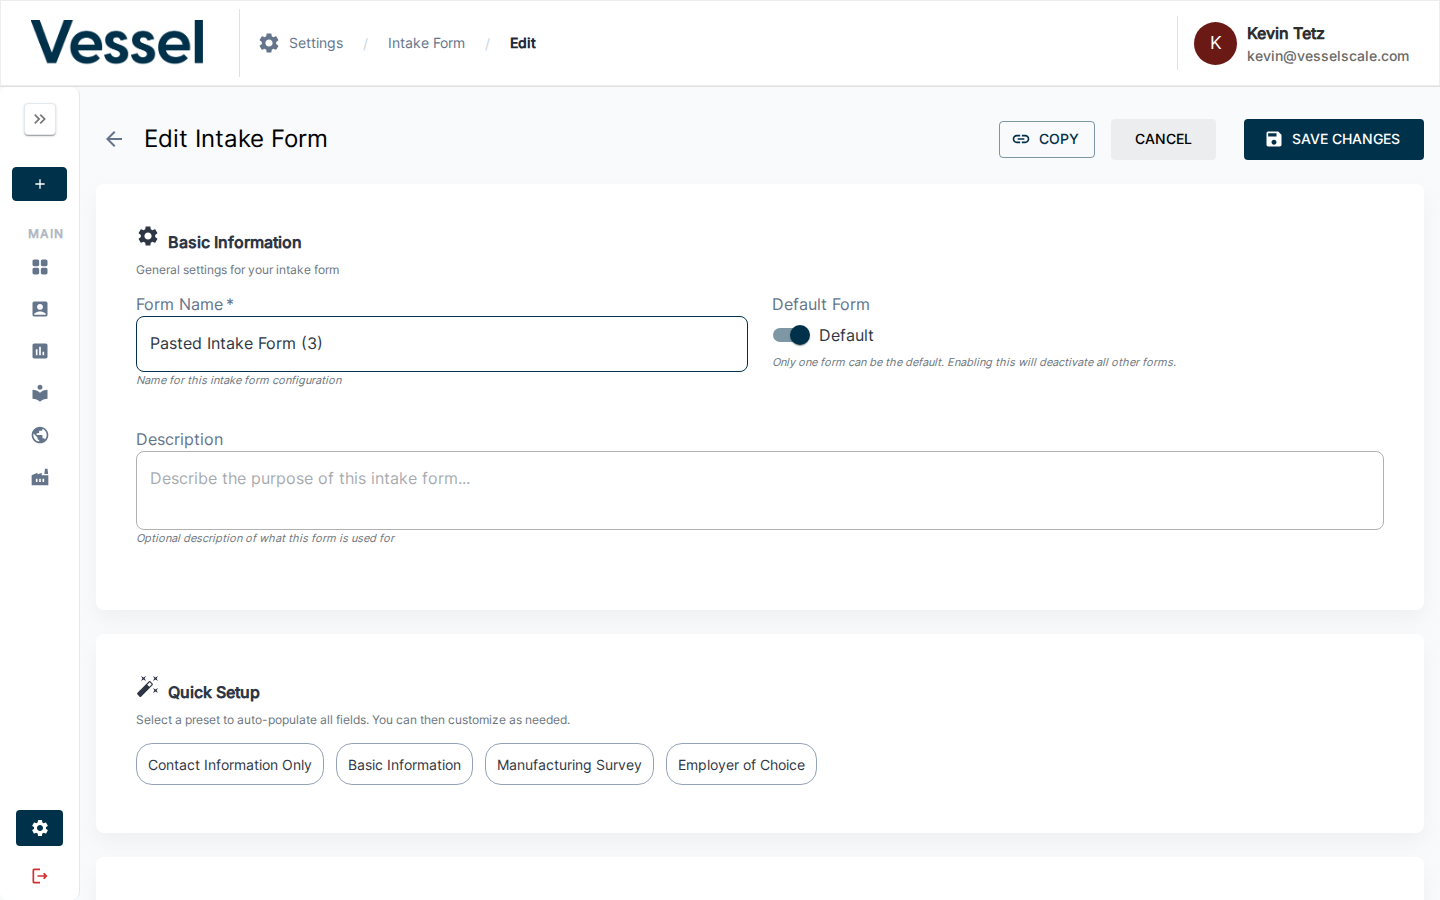
Editing a Configuration
The form editor is divided into several sections. Changes are only saved when you click Save Changes.

Basic Information
| Field | Description |
|---|---|
| Form Name | Internal label used in the list view. Required. |
| Description | Optional short description for internal reference |
| Default Form | Toggle to make this the active default. Only one form can be default at a time — enabling this automatically deactivates any other active form. |
Quick Setup (Presets)
Click a preset button to auto-populate all settings at once. You can then customize any section afterward. Available presets:
| Preset | Pages Included | Assessment Created |
|---|---|---|
| Contact Information Only | Company Selection, Contact Form | No |
| Basic Information | Company Selection, Contact Form, Company Size, Industry Type | No |
| Manufacturing Survey | Company Selection, Contact Form, County Selection, Company Size, Industry Type, Regional Associations | No |
| Employer of Choice | Company Selection, Contact Form, County Selection, Company Size, Industry Type, Regional Associations, Legal Agreement | Yes (requires assessment selection) |
Behavior Settings
| Setting | Description |
|---|---|
| Show Landing Page | Show an intro/landing page before the form begins. Enables the Landing Page Branding section. |
| Show Methodology Page | Show a methodology/explanation page before the form. Enables the Methodology Branding section. |
| Show Thank You Page | Show a confirmation page after submission. |
| Create Assessment | When enabled, automatically creates an assessment upon form submission. Enables the Assessment Configuration section. |
| Keep Collecting After Target | When an assessment is created, keep the parent assessment open even after its response target is reached. |
Assessment Configuration
Visible only when Create Assessment is enabled.
Parent Assessment — Select the assessment definition to create. When you pick a parent that has child assessments, the children are automatically included and listed below with their own target response fields.
Target Responses — The number of submissions before the assessment is considered complete.
Child Assessments — Listed automatically from the parent definition. Each child can have its own target response count (defaults to the parent's target).
Assessment Name Template — Controls how the created assessment is named. The default is {{account_name}} {{assessment_name}}. Available template variables:
| Variable | Description | Example |
|---|---|---|
{{account_name}} |
The submitting company's name | Acme Manufacturing |
{{assessment_name}} |
The assessment definition name | Employer of Choice |
{{current_year}} |
Four-digit year at time of submission | 2026 |
{{current_date}} |
Full date at time of submission | April 21, 2026 |
Page Configuration

Select which pages appear in the intake form. Company Selection and Contact Form are always required and cannot be removed.
| Page | What it does |
|---|---|
| Company Selection | Lets users search for an existing company or create a new one. Always included. |
| Contact Form | Collects name, email, and other contact details. Always included. |
| County Selection | Asks the user to select their county. Automatically makes State a required contact field when enabled. |
| Company Size | Asks the user to specify their company's employee count range. |
| Industry Type | Asks the user to select NAICS industry codes. |
| Regional Associations | Asks the user to select regional manufacturing associations they belong to. |
| Additional Information | Collects extended company details: secondary address, website, annual sales, government contractor/veteran/women-owned flags. |
| Legal Agreement | Displays a legal agreement that the user must accept before submitting. Enables the Legal Agreement editor below. |
Required Contact Form Information
Select which contact form fields are required. Fields marked as "always required" (First Name, Last Name, Email Address, Company Name) cannot be changed.
| Field | Always Required | Notes |
|---|---|---|
| First Name | Yes | |
| Last Name | Yes | |
| Email Address | Yes | |
| Company Name | Yes | |
| Job Title | No | |
| Phone Number | No | |
| Street Address | No | |
| City | No | |
| State | No | Auto-required when County Selection page is enabled |
| ZIP Code | No |
Legal Agreement
Visible only when the Legal Agreement page is enabled in Page Configuration.
A rich text (HTML) editor for the legal agreement text shown to users. When you first add the Legal Agreement page, this field is pre-filled with the platform's default EULA text, which you can customize or replace entirely.
Landing Page Branding
Visible only when Show Landing Page is enabled.
| Field | Description |
|---|---|
| Title | Main headline shown on the landing page |
| Subtitle | Secondary text below the headline |
| Description | Body text paragraphs (one paragraph per line) |
| Estimated Time | How long the form takes, shown to users (e.g., "15–20 minutes") |
Methodology Page Branding
Visible only when Show Methodology Page is enabled.
| Field | Description |
|---|---|
| Title | Heading for the methodology page |
| Description | Explanatory text about the assessment approach |
| Footer | Closing paragraph(s) (one paragraph per line) |
| Categories | List of assessment focus areas, each with an icon, title, and optional percentage. Use Auto-Populate from Assessment to populate from the selected assessment's question categories. |
The Public Intake Form URL
Every intake form has a shareable URL:
https://yourplatform.com/intake-form?formId={uuid}
- The UUID is the form's unique identifier, visible in the browser URL when editing it
- Use the Copy URL action from the list view to get this link quickly
- This link requires no login — anyone with the link can submit the form
- If
formIdis omitted, the platform uses the currently active default form
You can share this URL via email, embed it in a website, or use it as a landing page link.
How the Default Form Works
Only one intake form can be the default at a time. The default form is used when:
- Someone visits
/intake-formwithout aformIdparameter - An integration links to the intake form without specifying a particular config
Setting a form as default automatically deactivates the previously active form. The Active badge in the list view shows which form is currently the default.
Export and Import
Configurations can be shared across environments or backed up:
- Export: Use Download Config from the action menu to save a JSON file
- Import: Use Upload on the list page to create a new config from a JSON file, or use Paste to paste the JSON directly
When importing, a new configuration is created with a generated name. You can then rename and edit it before making it the default.
Email Notifications
Each form can send an email notification when a new submission is received. To configure this:
- In the form editor, find Email Notification in the Behavior Settings section
- Enable the Email Notifications toggle
- Enter the email address that should receive notifications
The notification is sent to a single address. For multiple recipients, consider a distribution list.
What Happens When Someone Submits
When a visitor submits the intake form, the platform automatically determines the right action based on whether the company and respondent are already in the system and whether an open assessment already exists for them.
Submission outcomes by scenario
The table below covers every combination of whether the company and respondent are already known to the platform, and what status any existing assessment is in.
| Company in platform? | Respondent email known? | Existing assessment? | Assessment status | What happens |
|---|---|---|---|---|
| No — new company | New | None | — | New company and contact are created. A new assessment is started. The respondent is taken directly into the assessment. |
| Yes — existing company | New contact | None | — | The new contact is added to the existing company. A new assessment is started. The respondent is taken directly into the assessment. |
| Yes — existing company | New contact | Yes | Draft | The new contact is added to the existing company. The respondent is taken into the existing open assessment to add their responses. No new assessment is created. |
| Yes — existing company | New contact | Yes | In Progress | The new contact is added to the existing company. The respondent is taken into the existing open assessment to add their responses. No new assessment is created. |
| Yes — existing company | New contact | Yes | Results Review | The new contact is added to the existing company. The prior assessment cycle is complete, so a new assessment is created for the new cycle. The respondent is taken into the new assessment. |
| Yes — existing company | New contact | Yes | Closed | The new contact is added to the existing company. The prior assessment cycle is complete, so a new assessment is created for the new cycle. The respondent is taken into the new assessment. |
| Yes — existing company | Returning (same email) | None | — | The respondent's contact details are updated. A new assessment is started. The respondent is taken directly into the assessment. |
| Yes — existing company | Returning (same email) | Yes | Draft or In Progress | The respondent's contact details are updated. The respondent is taken into the existing open assessment. No new assessment is created. |
| Yes — existing company | Returning (same email) | Yes | Results Review or Closed | The respondent's contact details are updated. A new assessment is created for the new cycle. The respondent is taken into the new assessment. |
How child assessments work
Some assessment types include a primary assessment and one or more sub-assessments (for example, a company-level survey and an employee-level survey). The intake form handles these automatically:
- When a visitor is directed to an existing open assessment, they go to the primary assessment. The sub-assessments are already in place and do not need to be recreated.
- When a new assessment is created, the platform automatically creates the primary assessment and all associated sub-assessments at the same time.
Error messages
If something prevents the form from completing, an error message is shown. The visitor can click Retry to try again or Close to return to the home page.
| Situation | Message Shown |
|---|---|
| A required field contains invalid information (e.g. a malformed email address) | A specific message describing the field and what needs to be corrected |
| The assessment for this company has already been created | "This assessment has already been created for this account. Please login through the client portal to see your results or contact your client manager for more details." |
| The submission could not be completed due to a technical problem | "Failed to create assessments." with additional detail if available |
| An unexpected error occurred | "An unexpected error occurred. Please try again." |
If a submission fails
Clicking Retry in the error modal will attempt the submission again from scratch. If the problem persists, contact your client manager or platform support.
Tips
- Versioning — Every save increments the version number. Use descriptions to note what changed between versions.
- Testing a form — After creating a config, copy the URL and open it in an incognito/private browser window to experience it exactly as a new visitor would.
- Preset + customize — The fastest way to create a new form is to apply a preset, then make targeted adjustments.
- Data-only forms — Disable Create Assessment to use the intake form purely for data collection without triggering any assessment workflow.
- Multiple forms — You can have many inactive forms (e.g., for different regions or assessment types) and share their specific URLs without affecting the default form.